"Green Wave" Tool
Introduction
The "Green Wave" tool now offers you the ability to synchronize traffic light phases of different intersections into coordinated corridors in the game.
For example, in downtown areas it can often happen that several cross streets cross the main traffic axis one after another.
To still guide traffic as optimally as possible along the main traffic axis over the respective intersections, you can use this tool to group individual intersections together.
In these corridor groups a reference intersection can then be defined, to which the other intersections in the group are aligned.
By giving other intersections in the group an "offset", i.e., time delay relative to the reference intersection, you can define in what time offset the respective intersection switches to Phase 1 after the reference intersection.
With some tinkering and/or good planning, your traffic lights along the corridor will then ideally switch to green just before approaching vehicles arrive (so that vehicles that missed the earlier phase cycle can still be cleared before new traffic arrives)
Preparing the Green Wave
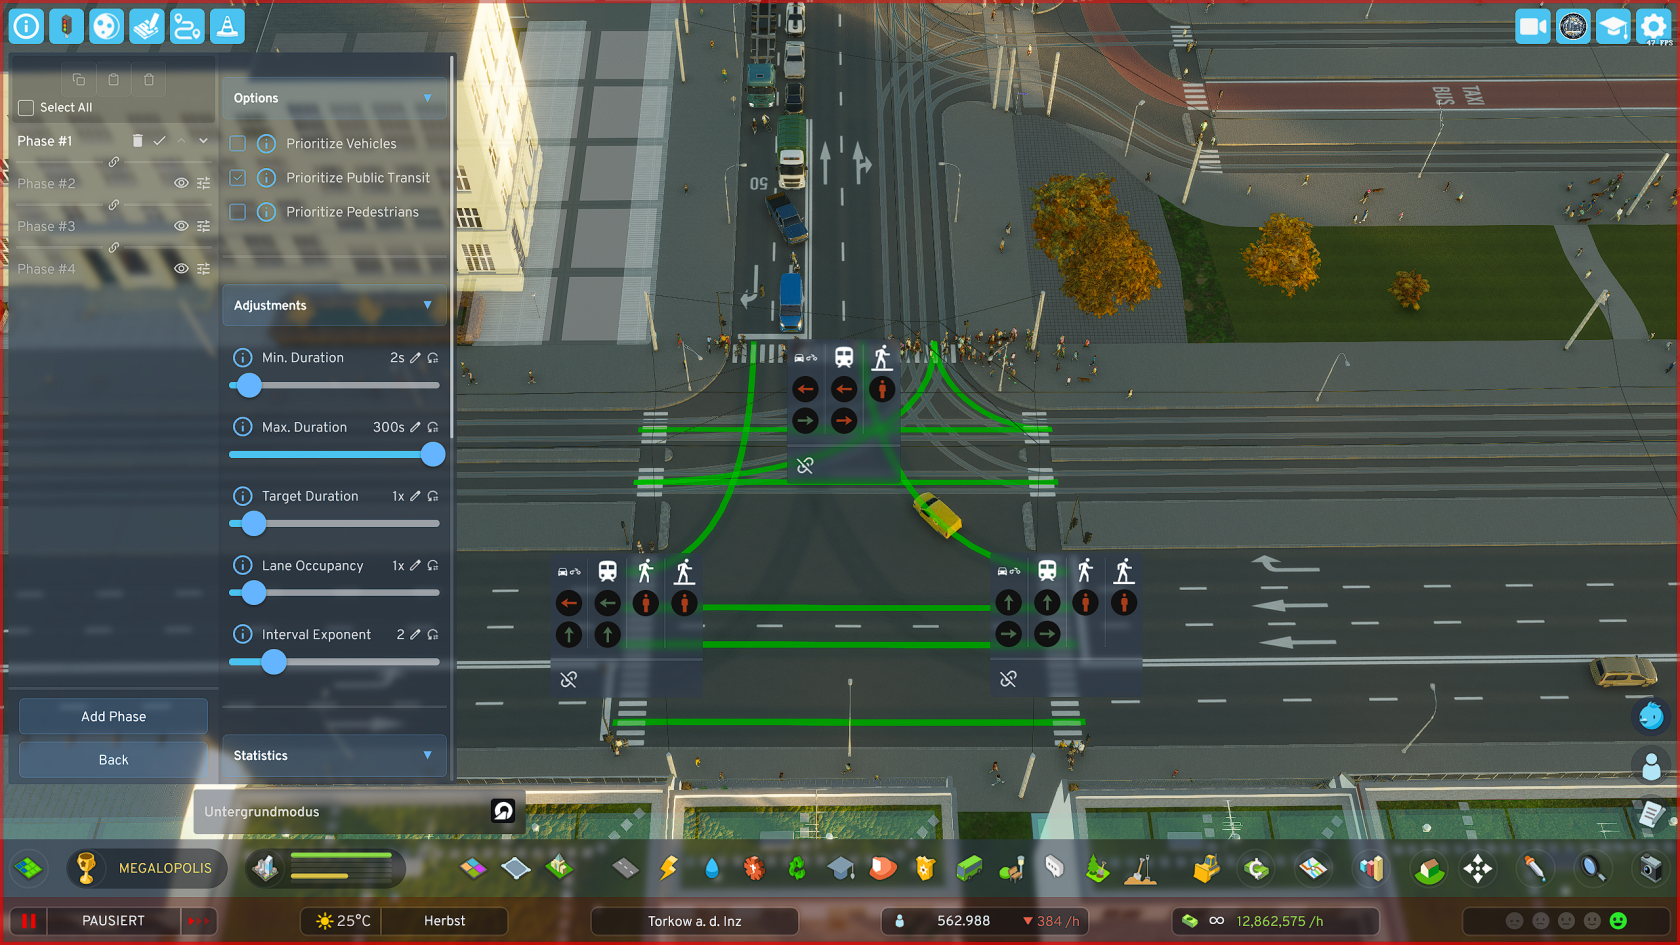
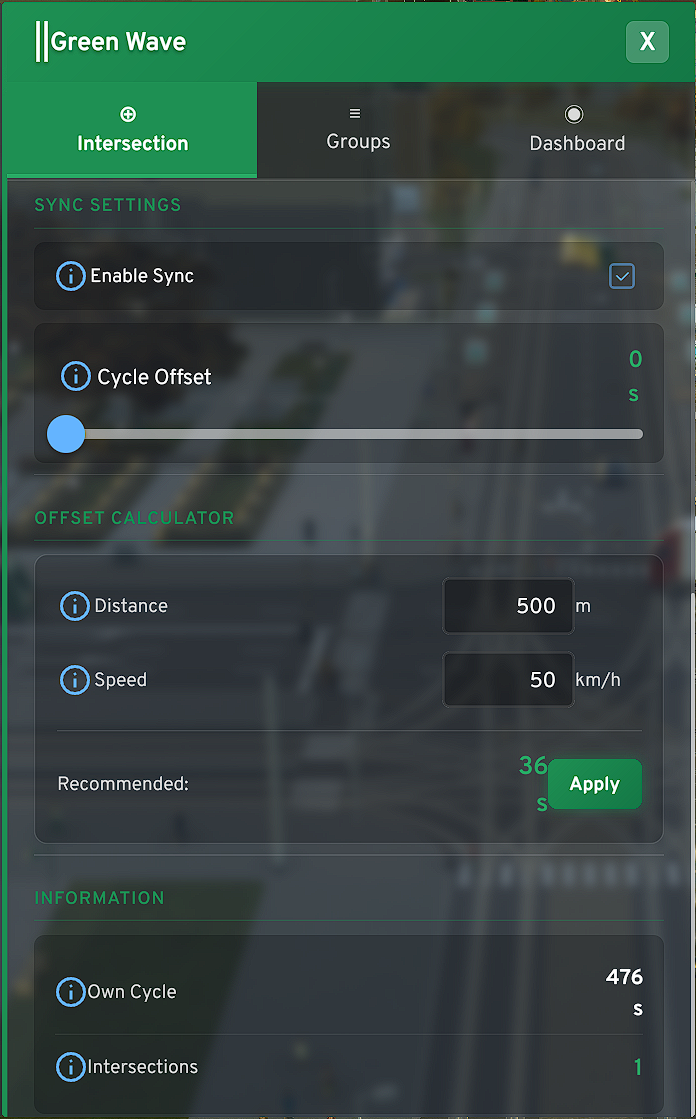
To be able to use the Green Wave tool, it is essential that you use custom phase cycles at the respective intersections and not any of the predefined options.
To save yourself work, you could for example copy the phase cycle of the reference intersection and paste it at intersections affected by the Green Wave.
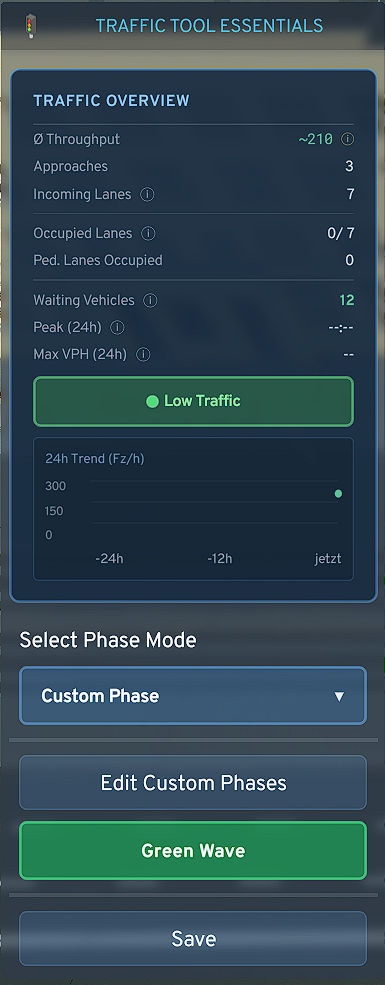
- If not already done: Set the phase mode in the dropdown menu to "Custom Phase" and create required phases in the intersection or copy phases from other intersections
- After that, you can already press the appearing "Green Wave" button
**Use Case Demonstration (Example)** *Including the marked reference intersection*
**Algorithm Design** *(Green Wave System Architecture)*
For a functioning "Green Wave" the first phase (P1) of each phase cycle must prioritize the traffic direction(s) in which the wave should be directed.
Note the following:
The first phase of an overall cycle must be the phase that determines the direction of the green wave. The system synchronizes all intersections so that they are ready to switch to Phase 1 at the right time when it's their turn.
The second phase of an overall cycle should be a "useful phase". This means: The system must use the last phase to compensate for any imbalances when individual intersections have too strongly deviating overall cycle durations (because not well aligned) or a too strongly deviating number of phases at the intersections (≥2 phase difference between at least one intersection and the others).
The last phase of intersections will therefore occasionally be stretched to keep the system in sync. To avoid "starving" crossing streets, i.e., compressing their phase length so the intersection can catch up, I decided to rather hold the last phase long in emergency and wait until the intersection could go through its cycle. There is also a Rush Mode, which the system activates during Force Release.
The Force Release has occasionally been noticed in version 2.2.2 for sometimes rough intervention. In the upcoming version update, these systems will also be adjusted again. In most use cases, however, this should not become a problem and can be circumvented by your own actions. Some tinkering is then required.
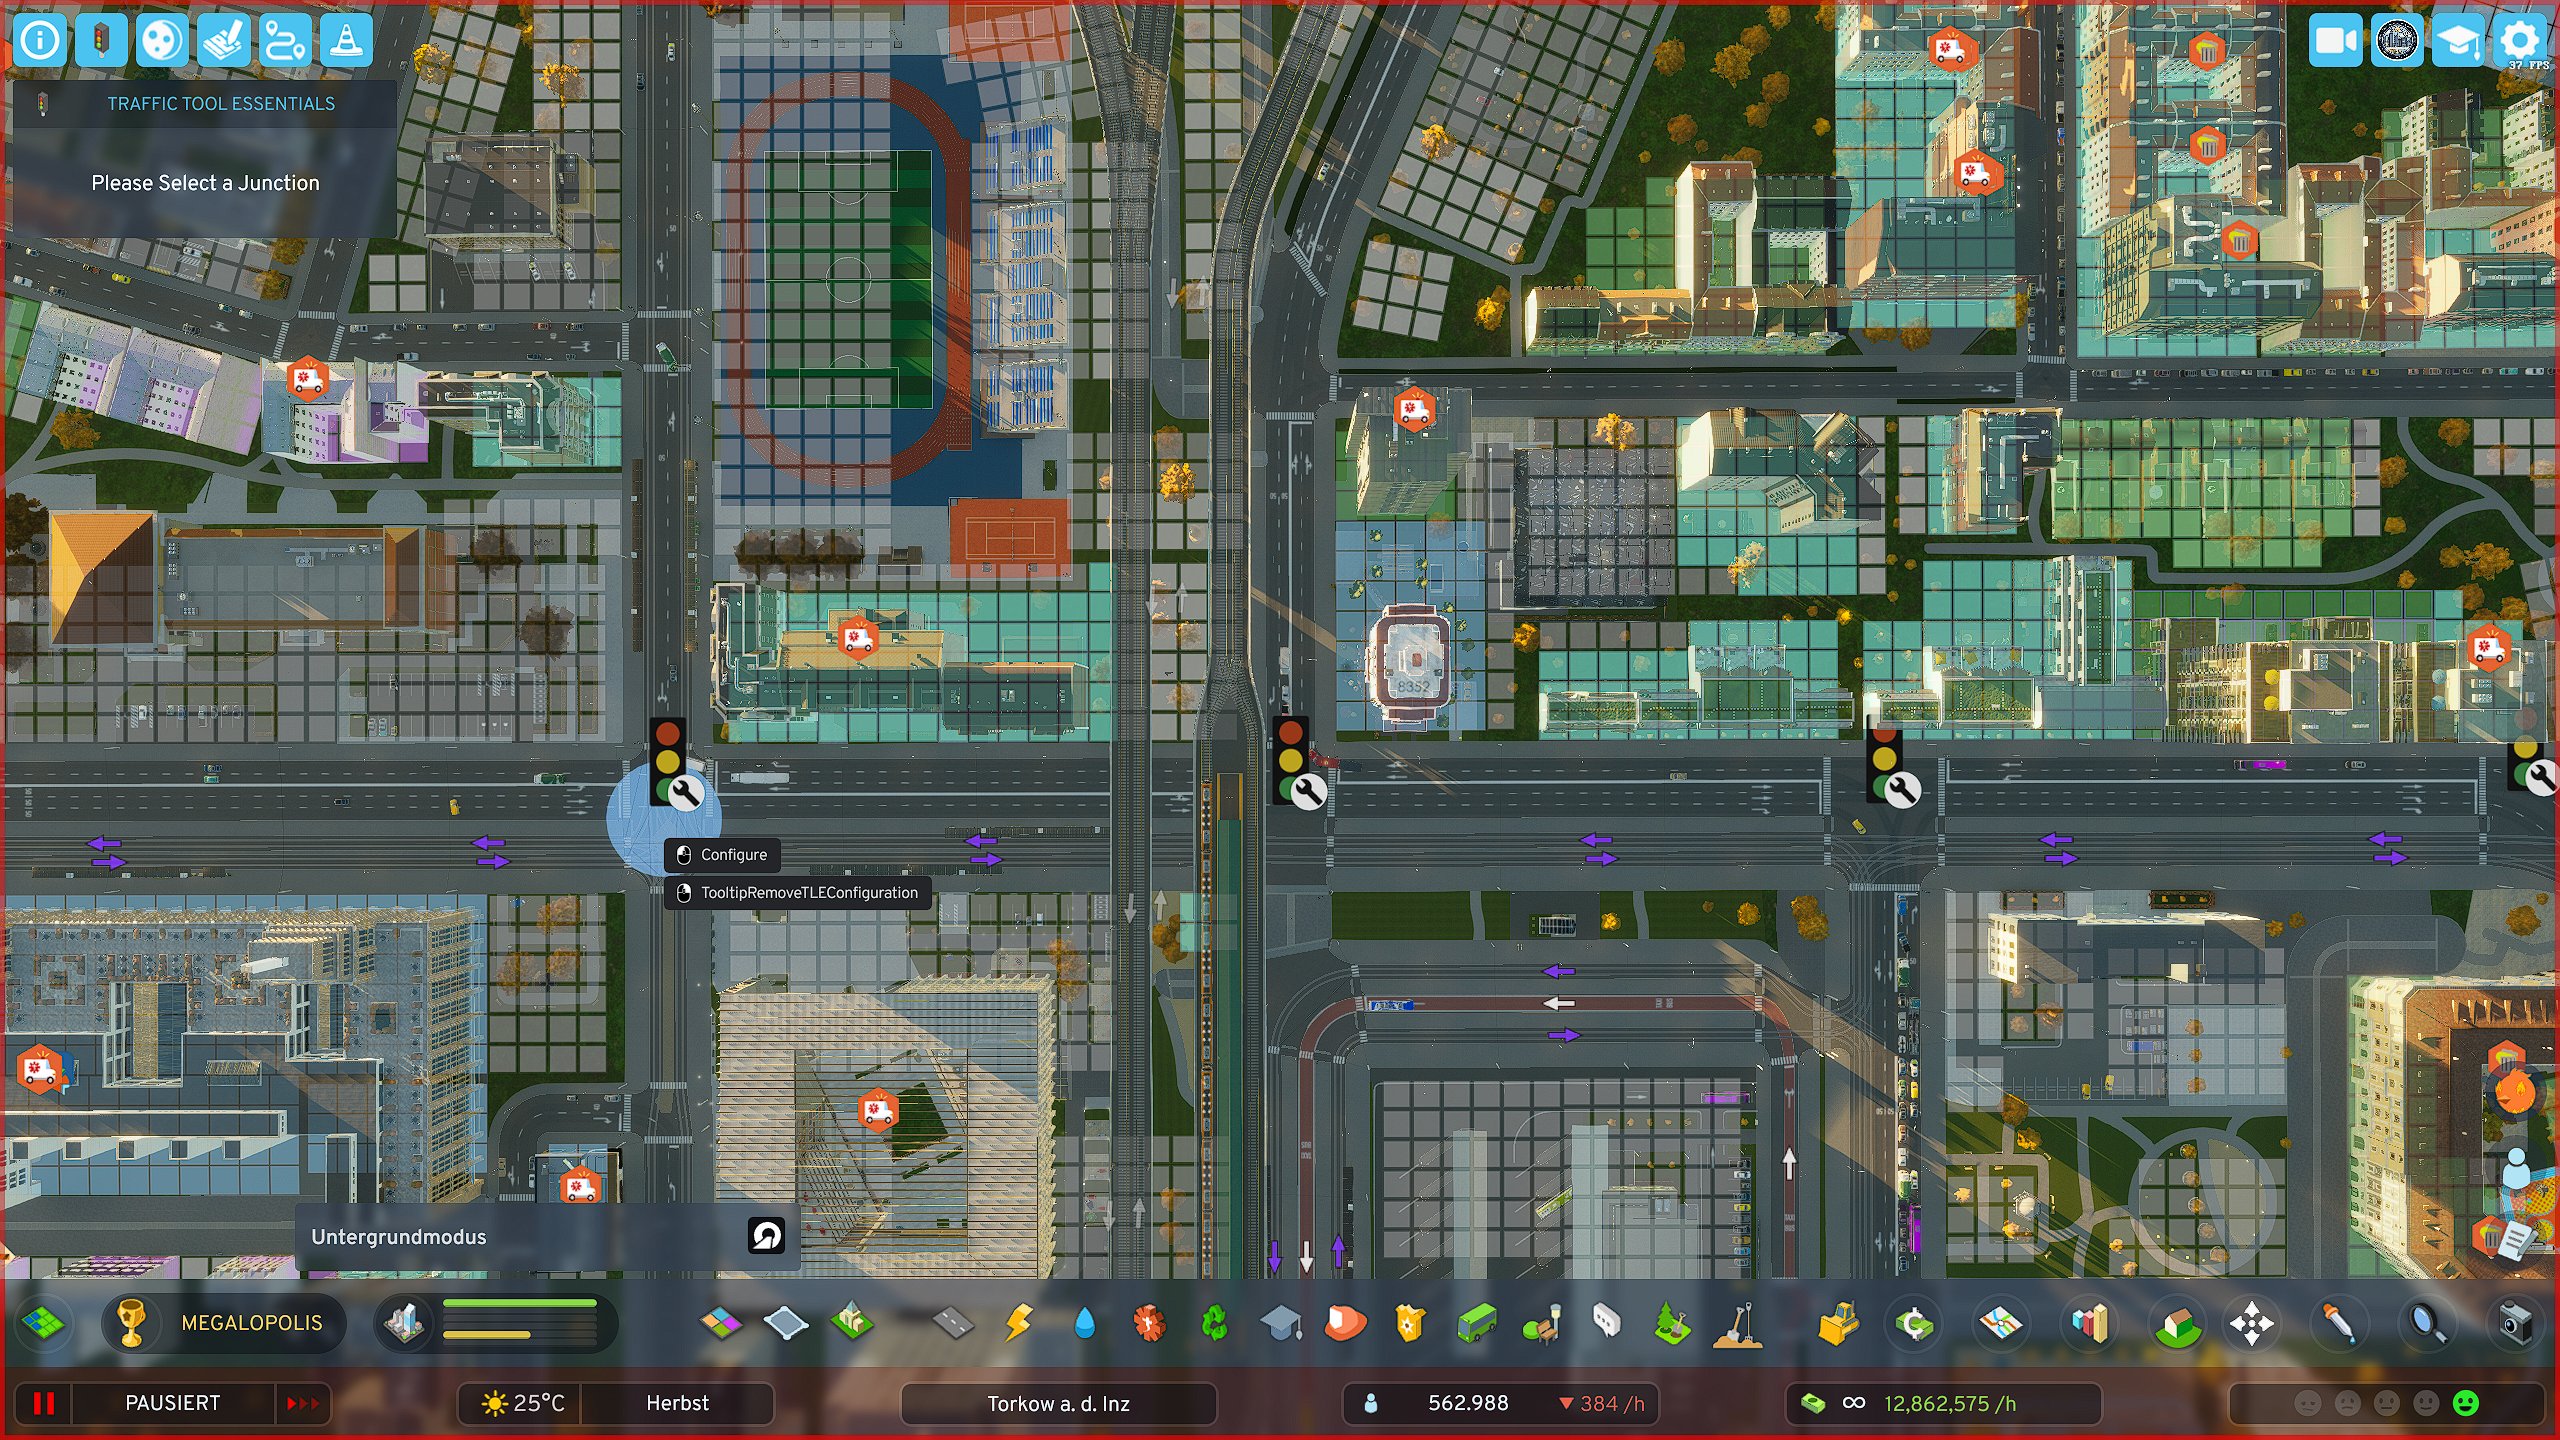
Creating a Corridor Group
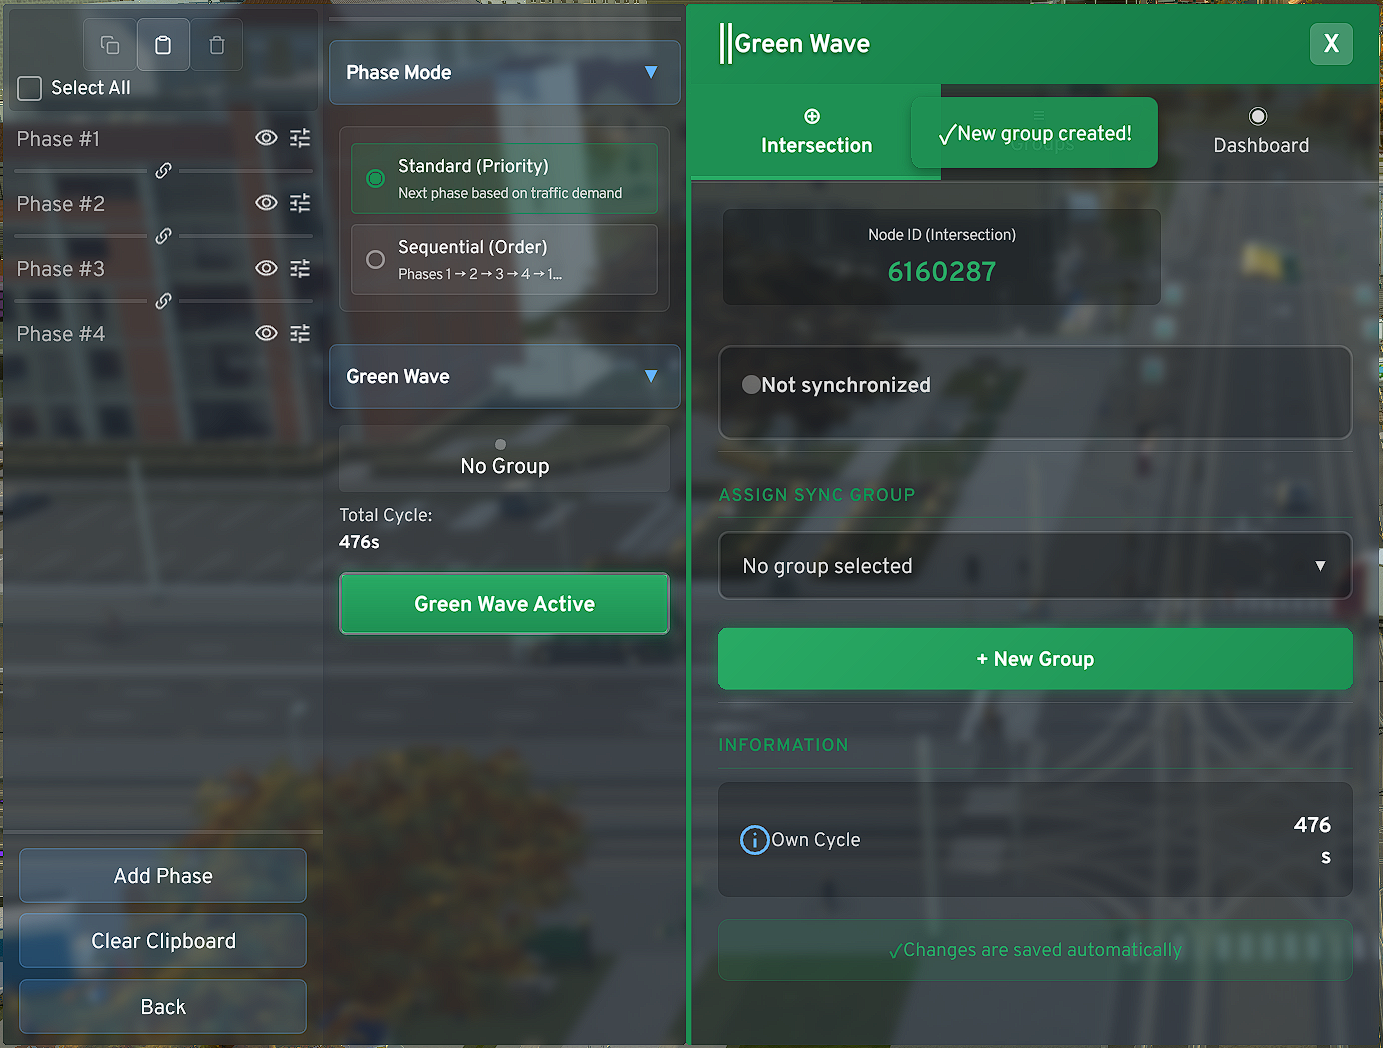
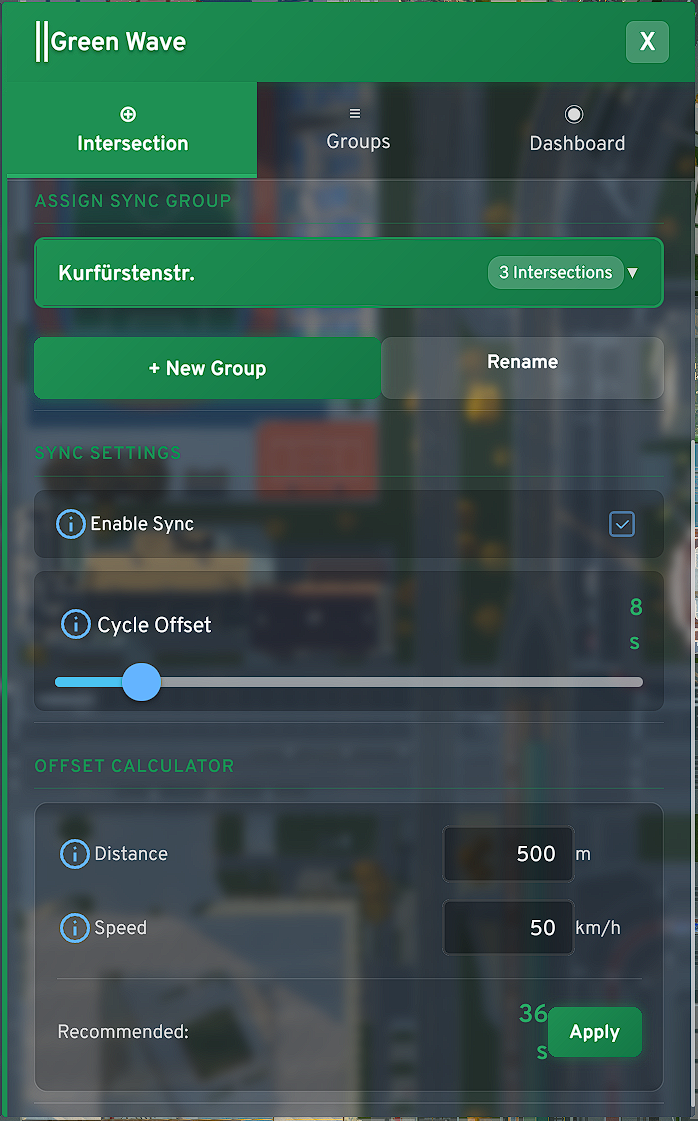
- Now click on "New Group", whereupon it will be created
- Select the just created group in the dropdown menu, which is still called "New Group", and/or rename it (preferably in the designated "Groups" tab)
- The first added intersection is in most cases also intended as the reference intersection. The reference intersection is determined with offset 0s. Or the intersection with the lowest offset automatically becomes the reference intersection.
- Now add another intersection, ideally directly the intersection following the reference intersection, then the one after that - and so on
- The intersections can easily be prioritized at any time via the offset setting
- The offset calculator can perhaps give you initial guidance to roughly estimate the values you need to set. With increasing city size and increasing simulation slowdown, 12 set seconds are of course no longer exactly 12s. In the backend, frames are converted to humanly understandable values and then transmitted to the frontend.
**System Architecture & Reference Logic** (summarized) *To ensure synchronicity across different intersection types, the system establishes a **dynamic reference control**. The following logic rules apply for stable operation:*
- P1 Prioritization: The first phase (P1) of a cycle defines the direction of the "Green Wave". The system times all intersections based on their individual offset so that they initialize Phase 1 on time at the calculated moment
- Sequential Phase Switching: For Green Wave operation, it is essential that phases switch according to the new "Sequential Mode" switching mode established with TTE, as phase switching in Legacy Mode from TLE cannot be predicted and thus cannot be synchronized. Nowhere in the world would a green wave be programmed this way, and neither here. To use Legacy Mode again, you must remove the affected intersection from the respective corridor group
- Dynamic Drift Compensation: With different overall cycle lengths of individual intersections or significantly deviating phase counts (difference ≥2), the system protects cross traffic from "starving". Instead of compressing phases, the last phase of an intersection's cycle is stretched when needed to balance imbalances and wait for the global timing of the reference intersection
- Reference Anchor (Offset 0s): The intersection with the lowest offset (ideally 0s) acts as the pacemaker. All further offsets must be calculated relative to the reference intersection – not to the respective previous intersection
Groups Panel
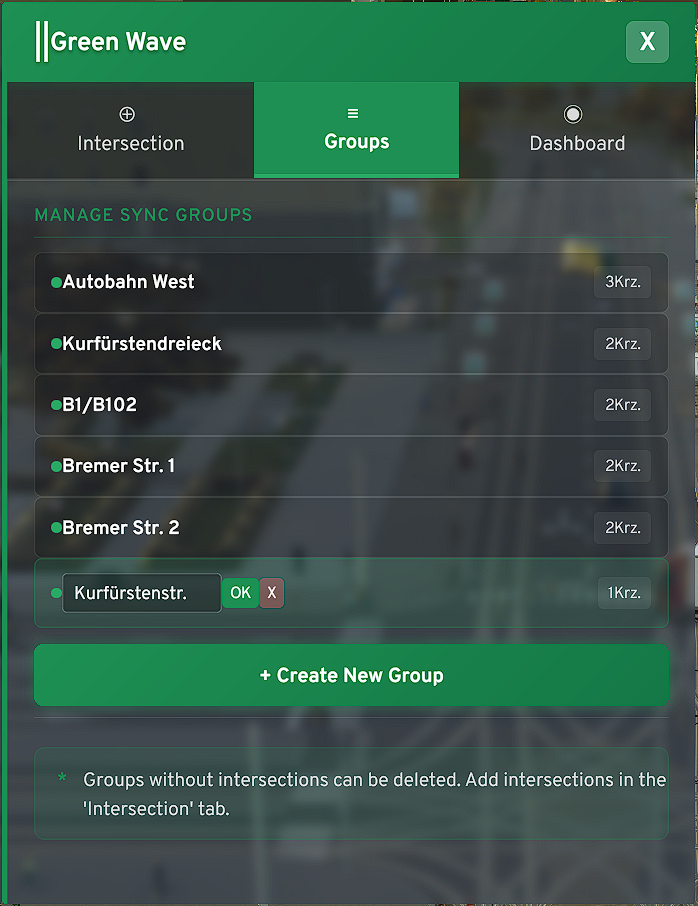
In the "Groups" tab you manage the logical units of your corridors. Here you define the basic structure before going into the fine-tuning of individual intersections.
- Central Management: Create new groups with one click, rename them for better overview (e.g., by main traffic axes like "B1 / Potsdamer Str.") or delete no longer needed associations
- ECS Logic: The system works resource-efficiently. Thanks to the Entity Component System (ECS) architecture, empty groups with no data stored are automatically not permanently saved. You don't have to worry about "cleaning up" orphaned, empty groups – the system handles this in the backend for you
- Status Feedback: Directly in the panel you can see at a glance how many intersections are already assigned to a group and whether the group has been initialized (recognizable by the green dot/status).
Rename your groups only after you have assigned the desired intersections in the "Intersection" tab. This simply prevents edge cases in data synchronization if you make complex changes to the group structure
Dashboard
The Dashboard is your control center. Here you see in real-time whether your planning is working out in the game world.
When you make significant changes to a corridor group, it can sometimes happen that you notice chaotic behavior - depends on the differences of the respective intersections
- The SYNC Status: If the SYNC icon lights up green, the intersection is successfully anchored in the group's global timing.
- If an intersection falls out of sync (e.g., through manual interventions or extreme simulation lags), you'll see here how the Force Release Logic or Rush Mode attempts to restore synchronicity.
- Phase Progress Bar: The green bar under "Phase X / Y" shows you exactly at which point of the cycle the intersection is located.
- Important: Since the system sometimes stretches the last phase when there is imbalance, you will observe here how the bar sometimes "waits" at the end of the cycle. This is not a bug, but the Dynamic Drift Compensation in action
- Cycle Variance: Here you also see the total duration of a cycle in seconds. Make sure that these values are as close as possible for all intersections in a group (harmless: e.g., 476s to 472s in the screenshot). The greater the difference, the more massive the system intervention needs to be
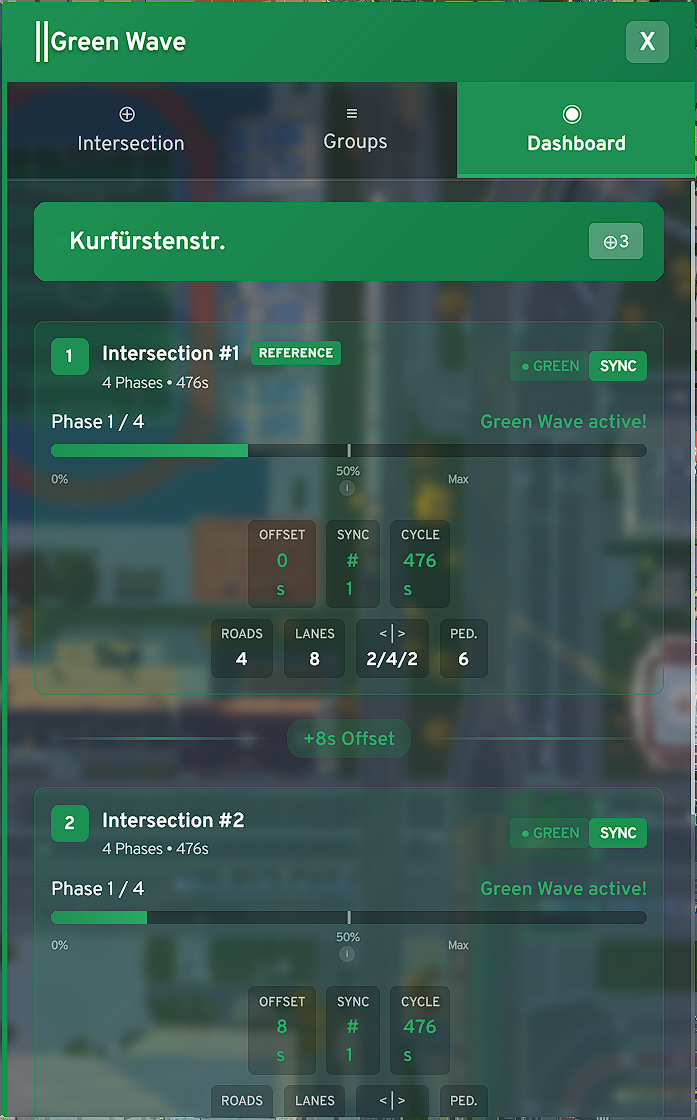
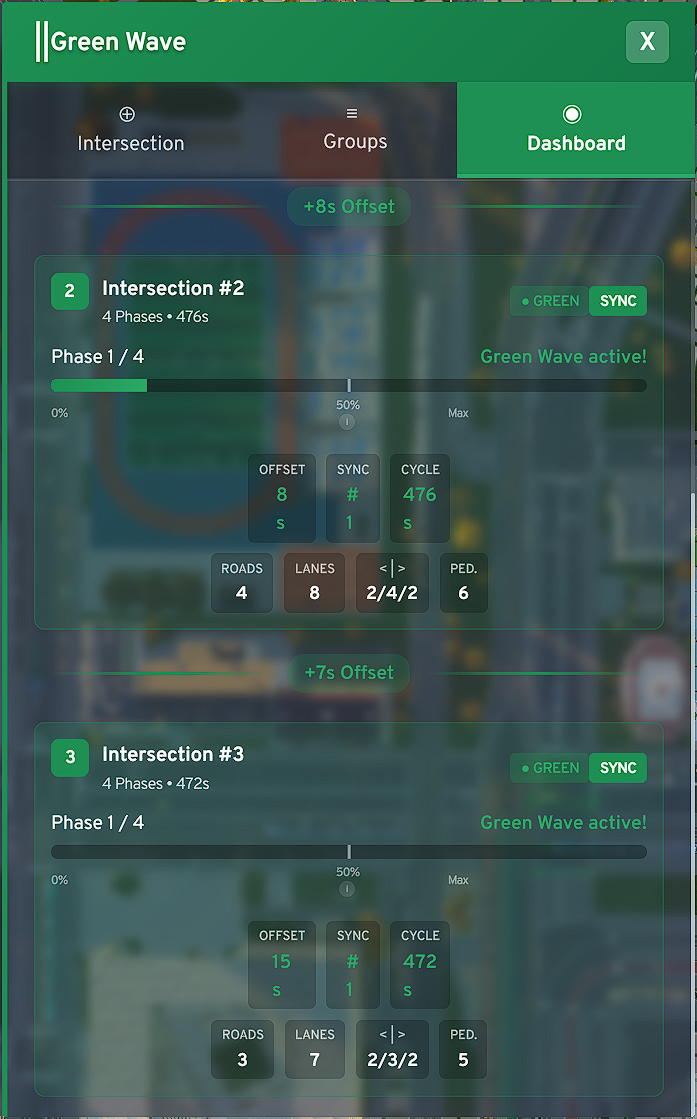
**Finding the "perfect" Offset** - Use the Dashboard to observe the real traffic flow. If you see that vehicles arrive at intersection #2, but the bar is only at 10% of Phase 1, your offset is too high. The goal is for Phase 1 to start (bar starts running) when the vehicle queue from the reference intersection reaches the stop line, or perhaps a bit earlier to account for a tram that previously held up the Green Wave. You have complete freedom!
Known Issue - When creating and setting up groups, it can happen that all intersections hang at P1 in the Dashboard and do nothing. This is really not nice, but you can work around it. Remove all intersections from the affected group, delete this group once it contains no more intersections, create a new group and rename it only when the desired intersections are in it and running. After that, there should be no more problems, no matter what changes you make. When all phase cycles of the intersections are identical in length, the system can sometimes run into an edge case where the Force Release Logic is not called at all, which should kick in in such cases.